Getting started
This tutorial introduces you to the essentials of Scaffander by walking you through building a basic generator with custom project template step by step.
Prerequisites
To get the most out of this tutorial you should have a basic understanding of Spring Boot and Maven which we choosen for this example, hovewer it is not necessary for understading the Scaffander concepts.
Example code generator
Code generators are tools for generating project scaffoldings. Generator itself consists of code templates
Code template represents file and directory structure for particular technology (framework, scripts, build system, configuration files etc.) and can be customized by input variables. In other words, generator is just a composition of code templates into meaningful technology stack.
In our example, we will combine basic Spring Boot application template and Maven Wrapper template.
Introduction
When you start a new project, you can prepare the initial codebase all by yourself by creating basic file and directory structure, adding initial code, deployment scripts, license or readme files, common libraries and much more. Some frameworks even offer code generators to generate basic structure of your application easily. Good examples are Spring Boot initializr or Quarkus generator. These are both great tools simplifying developer’s life, however they offer limited way how you can customize generated output (how to add custom libraries?), also it is not possible to combine them with other code templates (how to add custom configuration files?).
So what about to create code generator, which generates codebase exactly according your team preferences?
Starting code
We have prepared basic Spring Boot application, which displays landing page with information about your project. Consider it as starting code, used when your team want to begin development of new microservice.

As you can see, landing page contains project name, version, description and link to sevice API. We are going to parametrize these parts, so you can specify their values when the final scaffolding is going to be generated.
1. Download starting code
Download starting code as ZIP or from GitHub
You can try to run the application by executing command:
./mvnw spring-boot:runin the project directory.
2. Remove unnnecesary files
Lets have a look on codebase structure:
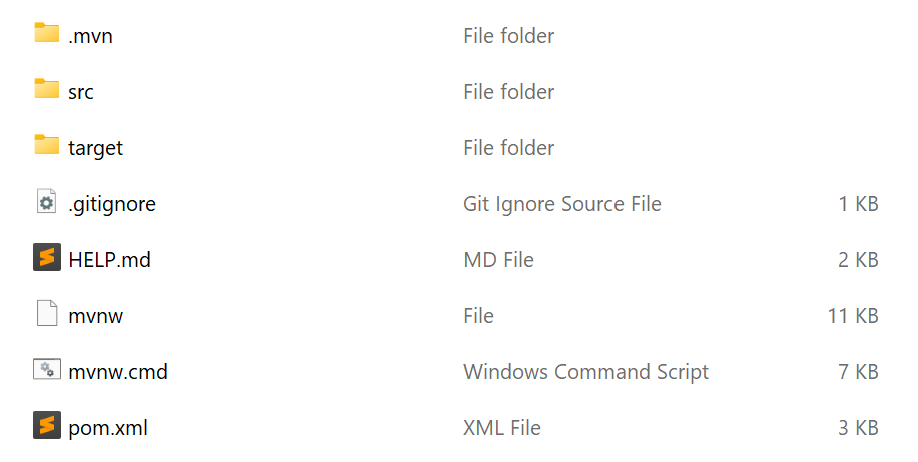
As you can see, it consists of 2 different parts - Spring microservice with basic code and Maven Wrapper (.mvn directory, mvnw and nvnw.bat files).
Now we are going to convert this microservice scaffolding into code generator. As we mentioned above, generator is a composition of multiple code templates. In our case, we have 2 templates – Spring microservice template and Maven Wrapper template. Althought you can put everything into single template if you want, Scaffander already provides a lot of common templates and it is much easier to reuse them. In our scenario we will reuse Maven Wrapper, so we just need prepare the microservice part.
Lets then delete these Maven Wrapper and generated directories:
.mvnwdirectorymvnwfilemvnw.batfiletargetdirectory (since it is generated directory)
The output directory will look like this:

3. Create template definition
Create .scf directory in project root, which will contain template metadata. Create new template.yaml file in .scf directory with following content:
1
2
3
4
5
6
7
8
9
10
11
12
13
14
15
16
17
18
19
20
21
22
23
24
25
26
27
28
29
30
31
32
33
34
35
36
37
38
39
40
41
42
43
44
45
46
47
48
49
50
51
52
53
54
55
56
57
58
59
60
61
62
63
64
65
66
67
version: 1.0
templates:
  - "**\\*.java"
  - "**\\*.xml"
directoryExpansion:
  - name: _package_
    value: ${package?replace(".", "/")}
variables:
  - id: springBootVersion
    name: Spring Boot
    type: choice
    required: true
    options:
      - name: "latest"
        value: "2.6.3"
      - value: "2.6.3"
      - value: "2.5.9"
  - id: name
    name: Name
    type: string
    required: true
  - id: description
    name: Description
    type: string
  - id: groupId
    name: Group ID
    type: string
    required: true
  - id: artifactId
    name: Artifact ID
    type: string
    required: true
  - id: version
    name: Version
    type: string
    required: true
  - id: package
    name: Package
    type: string
    required: true
  - id: dependencies
    name: Dependencies
    type: list
    items:
      - id: lombok
        name: Lombok
        description: Java annotation library which helps to reduce boilerplate code.
        group: Web
        data:
          groupId: org.springframework.boot
          artifactId: spring-boot-starter-data-rest
      - id: springboot-devtools
        name: Spring Boot DevTools
        description: Provides fast application restarts, LiveReload, and configurations for enhanced development experience.
        group: Developer tools
        data:
          groupId: org.springframework.boot
          artifactId: spring-boot-devtools
          scope: runtime
          optional: true
      - id: springboot-configuration-processor
        name: Thymeleaf
        description: A modern server-side Java template engine for both web and standalone environments. Allows HTML to be correctly displayed in browsers and as static prototypes.
        group: Developer tools
        data:
          groupId: org.springframework.boot
          artifactId: spring-boot-starter-thymeleaf
Template definition for our example contains these sections:
- Version (line 1) - Version of template definition file, only version 1.0 is currently supported.
- Templates (lines 2 - 4) - Mark all XML and Java files as template files using Ant matching expression. Template files can use FreeMarker template language to parametrize file contents. Template markup is be evaluated during project generation. We will explain it later in the tutorial.
-
Directory expansion (lines 5 - 7) - This section tells Scaffander to expand all directories named
_package_according to package name. Expression${package?replace(".", "/")}will take value of package variable (e.g.com.example.demo), replaces all occurences of dot.character with slash/character.The final path for given package name will be
com/example/demo, and therefore all contents of_package_directory will be moved intocom/example/demoand removed afterwards. - Variables (lines 8 - 67) - defines input variables for this template, which can be used in template files. All variables must have at least its unique identifier (
id) used in template files to reference the variable, display name (name), type of the value (type) and optionallyrequiredparameter (false by default). Further variable parameters depends on variable type, all types are described here.
4. Update directories for directory expansion
Our template currently has the path “hardcoded” in com/example/demo, but we want to resolve this path dynamically based on package variable.
Move contents of src/main/java/com/example/demo into new directory src/main/java/_package_ and delete src/main/java/com directory completely. As we defined in template defintion file above directory _package_ will be expanded automatically according to package name.
5. Update template files
We marked all .java and .xml files in template definition as teplate files. This means we can use FreeMarker templating notation to generate their content dymanically.
Java files:
In all 3 files under src/main/java/_package_/, replace package definition on first line: org.example.demo → ${package}, for example:
1
2
3
4
5
6
7
8
9
10
11
package com.example.demo.dto;

import lombok.Data;

@Data
public class ServiceInfo {

    String name;
    String description;

}
1
2
3
4
5
6
7
8
9
10
11
package ${package}.dto;

import lombok.Data;

@Data
public class ServiceInfo {

    String name;
    String description;

}
Variable package is defined in template defintion. We say that ${package} markup is variable interpolation.
pom.xml file
1
2
3
4
5
6
7
8
9
10
11
12
13
14
15
16
17
18
19
20
21
22
23
24
25
26
27
28
29
30
31
32
33
34
35
36
37
38
39
40
41
42
43
44
45
46
47
48
49
50
51
52
53
54
55
56
57
58
59
60
61
62
63
64
65
66
67
68
69
70
71
72
73
74
75
76
77
78
79
80
81
82
83
84
85
<?xml version="1.0" encoding="UTF-8"?>
<project xmlns="http://maven.apache.org/POM/4.0.0" xmlns:xsi="http://www.w3.org/2001/XMLSchema-instance"
         xsi:schemaLocation="http://maven.apache.org/POM/4.0.0 https://maven.apache.org/xsd/maven-4.0.0.xsd">
  <modelVersion>4.0.0</modelVersion>
  <parent>
    <groupId>org.springframework.boot</groupId>
    <artifactId>spring-boot-starter-parent</artifactId>
    <version>2.6.3</version>
    <relativePath/> <!-- lookup parent from repository -->
  </parent>
  <groupId>com.attasoft</groupId>
  <artifactId>microservice</artifactId>
  <version>1.0.0-SNAPSHOT</version>
  <name>microservice</name>

  <description>This is sample microservice for testing scaffolding generator</description>


  <properties>
    <java.version>11</java.version>
  </properties>

  <dependencies>
    <dependency>
      <groupId>org.springframework.boot</groupId>
      <artifactId>spring-boot-starter-web</artifactId>
    </dependency>
    <dependency>
      <groupId>org.springframework.boot</groupId>
      <artifactId>spring-boot-configuration-processor</artifactId>
      <optional>true</optional>
    </dependency>
    <dependency>
      <groupId>org.projectlombok</groupId>
      <artifactId>lombok</artifactId>
      <optional>true</optional>
    </dependency>
    <dependency>
      <groupId>org.springframework.boot</groupId>
      <artifactId>spring-boot-starter-actuator</artifactId>
    </dependency>
    <dependency>
      <groupId>org.springdoc</groupId>
      <artifactId>springdoc-openapi-ui</artifactId>
      <version>1.6.4</version>
    </dependency>
    <dependency>
      <groupId>org.springframework.boot</groupId>
      <artifactId>spring-boot-starter-test</artifactId>
      <scope>test</scope>
    </dependency>


  </dependencies>

  <build>
    <plugins>
      <plugin>
        <groupId>org.springframework.boot</groupId>
        <artifactId>spring-boot-maven-plugin</artifactId>
        <configuration>
          <excludes>
            <exclude>
              <groupId>org.projectlombok</groupId>
              <artifactId>lombok</artifactId>
            </exclude>
          </excludes>
        </configuration>
      </plugin>
    </plugins>
  </build>

</project>
1
2
3
4
5
6
7
8
9
10
11
12
13
14
15
16
17
18
19
20
21
22
23
24
25
26
27
28
29
30
31
32
33
34
35
36
37
38
39
40
41
42
43
44
45
46
47
48
49
50
51
52
53
54
55
56
57
58
59
60
61
62
63
64
65
66
67
68
69
70
71
72
73
74
75
76
77
78
79
80
81
82
83
84
85
<?xml version="1.0" encoding="UTF-8"?>
<project xmlns="http://maven.apache.org/POM/4.0.0" xmlns:xsi="http://www.w3.org/2001/XMLSchema-instance"
         xsi:schemaLocation="http://maven.apache.org/POM/4.0.0 https://maven.apache.org/xsd/maven-4.0.0.xsd">
  <modelVersion>4.0.0</modelVersion>
  <parent>
    <groupId>org.springframework.boot</groupId>
    <artifactId>spring-boot-starter-parent</artifactId>
    <version>${springBootVersion}</version>
    <relativePath/> <!-- lookup parent from repository -->
  </parent>
  <groupId>${groupId}</groupId>
  <artifactId>${artifactId}</artifactId>
  <version>${version}</version>
  <name>${name}</name>
  <#if description??>
  <description>${description}</description>
  </#if>

  <properties>
    <java.version>11</java.version>
  </properties>

  <dependencies>
    <dependency>
      <groupId>org.springframework.boot</groupId>
      <artifactId>spring-boot-starter-web</artifactId>
    </dependency>
    <dependency>
      <groupId>org.springframework.boot</groupId>
      <artifactId>spring-boot-configuration-processor</artifactId>
      <optional>true</optional>
    </dependency>
    <dependency>
      <groupId>org.projectlombok</groupId>
      <artifactId>lombok</artifactId>
      <optional>true</optional>
    </dependency>
    <dependency>
      <groupId>org.springframework.boot</groupId>
      <artifactId>spring-boot-starter-actuator</artifactId>
    </dependency>
    <dependency>
      <groupId>org.springdoc</groupId>
      <artifactId>springdoc-openapi-ui</artifactId>
      <version>1.6.4</version>
    </dependency>
    <dependency>
      <groupId>org.springframework.boot</groupId>
      <artifactId>spring-boot-starter-test</artifactId>
      <scope>test</scope>
    </dependency>
    <#if dependencies??>
    <#list dependencies as dependency>
    <dependency>
      <groupId>${dependency.data.groupId}</groupId>
      <artifactId>${dependency.data.artifactId}</artifactId>
      <#if dependency.data.scope??>
      <scope>${dependency.data.scope}</scope>
      </#if>
      <#if dependency.data.optional??>
      <optional>${dependency.data.optional}</optional>
      </#if>
    </dependency>
    </#list>
    </#if>
  </dependencies>

  <build>
    <plugins>
      <plugin>
        <groupId>org.springframework.boot</groupId>
        <artifactId>spring-boot-maven-plugin</artifactId>
        <configuration>
          <excludes>
            <exclude>
              <groupId>org.projectlombok</groupId>
              <artifactId>lombok</artifactId>
            </exclude>
          </excludes>
        </configuration>
      </plugin>
    </plugins>
  </build>

</project>
Lines 11 - 14:
${groupId}, ${artifactId}, ${version}, ${name} - as we already know, these are variable interpolations and will be replaced by variable values.
Lines 15 - 17:
Since description is optional variable, we have to make entire <description> element optional by using FreeMarker <#if> directive and ?? operator which tests whether description values is present.
<#if description??>
<description>${description}</description>
</#if>
Lines 52 - 65:
This part checks if dependencies is defined (<#if dependencies??>). If so, it loops the list variable dependencies (<#list dependencies as dependency>) and renders its own <dependency> element for each one.
<#if dependencies??>
<#list dependencies as dependency>
<dependency>
  <groupId>${dependency.data.groupId}</groupId>
  <artifactId>${dependency.data.artifactId}</artifactId>
  <#if dependency.data.scope??>
  <scope>${dependency.data.scope}</scope>
  </#if>
  <#if dependency.data.optional??>
  <optional>${dependency.data.optional}</optional>
  </#if>
</dependency>
</#list>
</#if>
6. Commit your changes into Git repository
The code is prepared now, you need to commit and push your sources into new Git repoistory. You can use GitHub, Bitbucket or any other Git provider.
git init
git add .
git commit -a -m "initial commit"
git remote add your_repository_remote_url
git push -u origin master
For demo purposes, please use public repository, so Scaffoler can access it. Alhought Scaffander supports also private repositories, it requires to set up GitHub or Bitbucket integration in Scaffander settings, which is out of scope of this tutorial.
For next step you will need HTTPS repository URL, for example https://github.com/my/repository.git or https://bitbucket.org/my/repository.git
7. Register your template in Scaffander
Now open Scaffander, choose Templates → Add Template in fill template form and confirm:
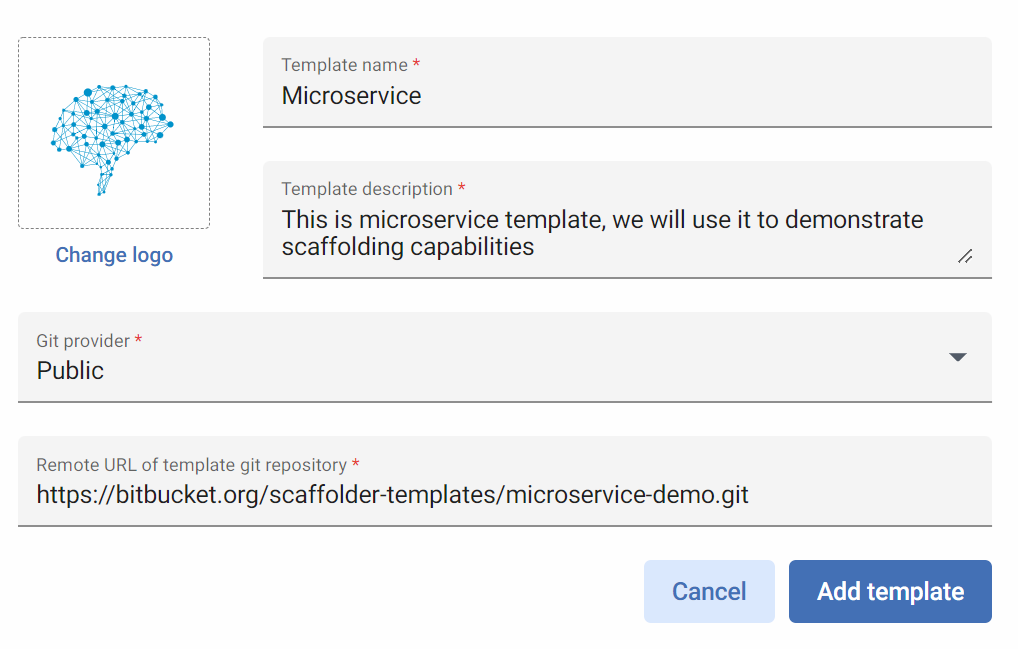
Scaffander will now try to load and parse your template from Git. If you made an error in template.yaml file, Scaffander displays ‘PULL FAILED’ message (you can show error details by clicking on it). If verything went ok, your template is loaded and you can check how it looks like by clicking on more button (3 vertical dots icon) and Preview:

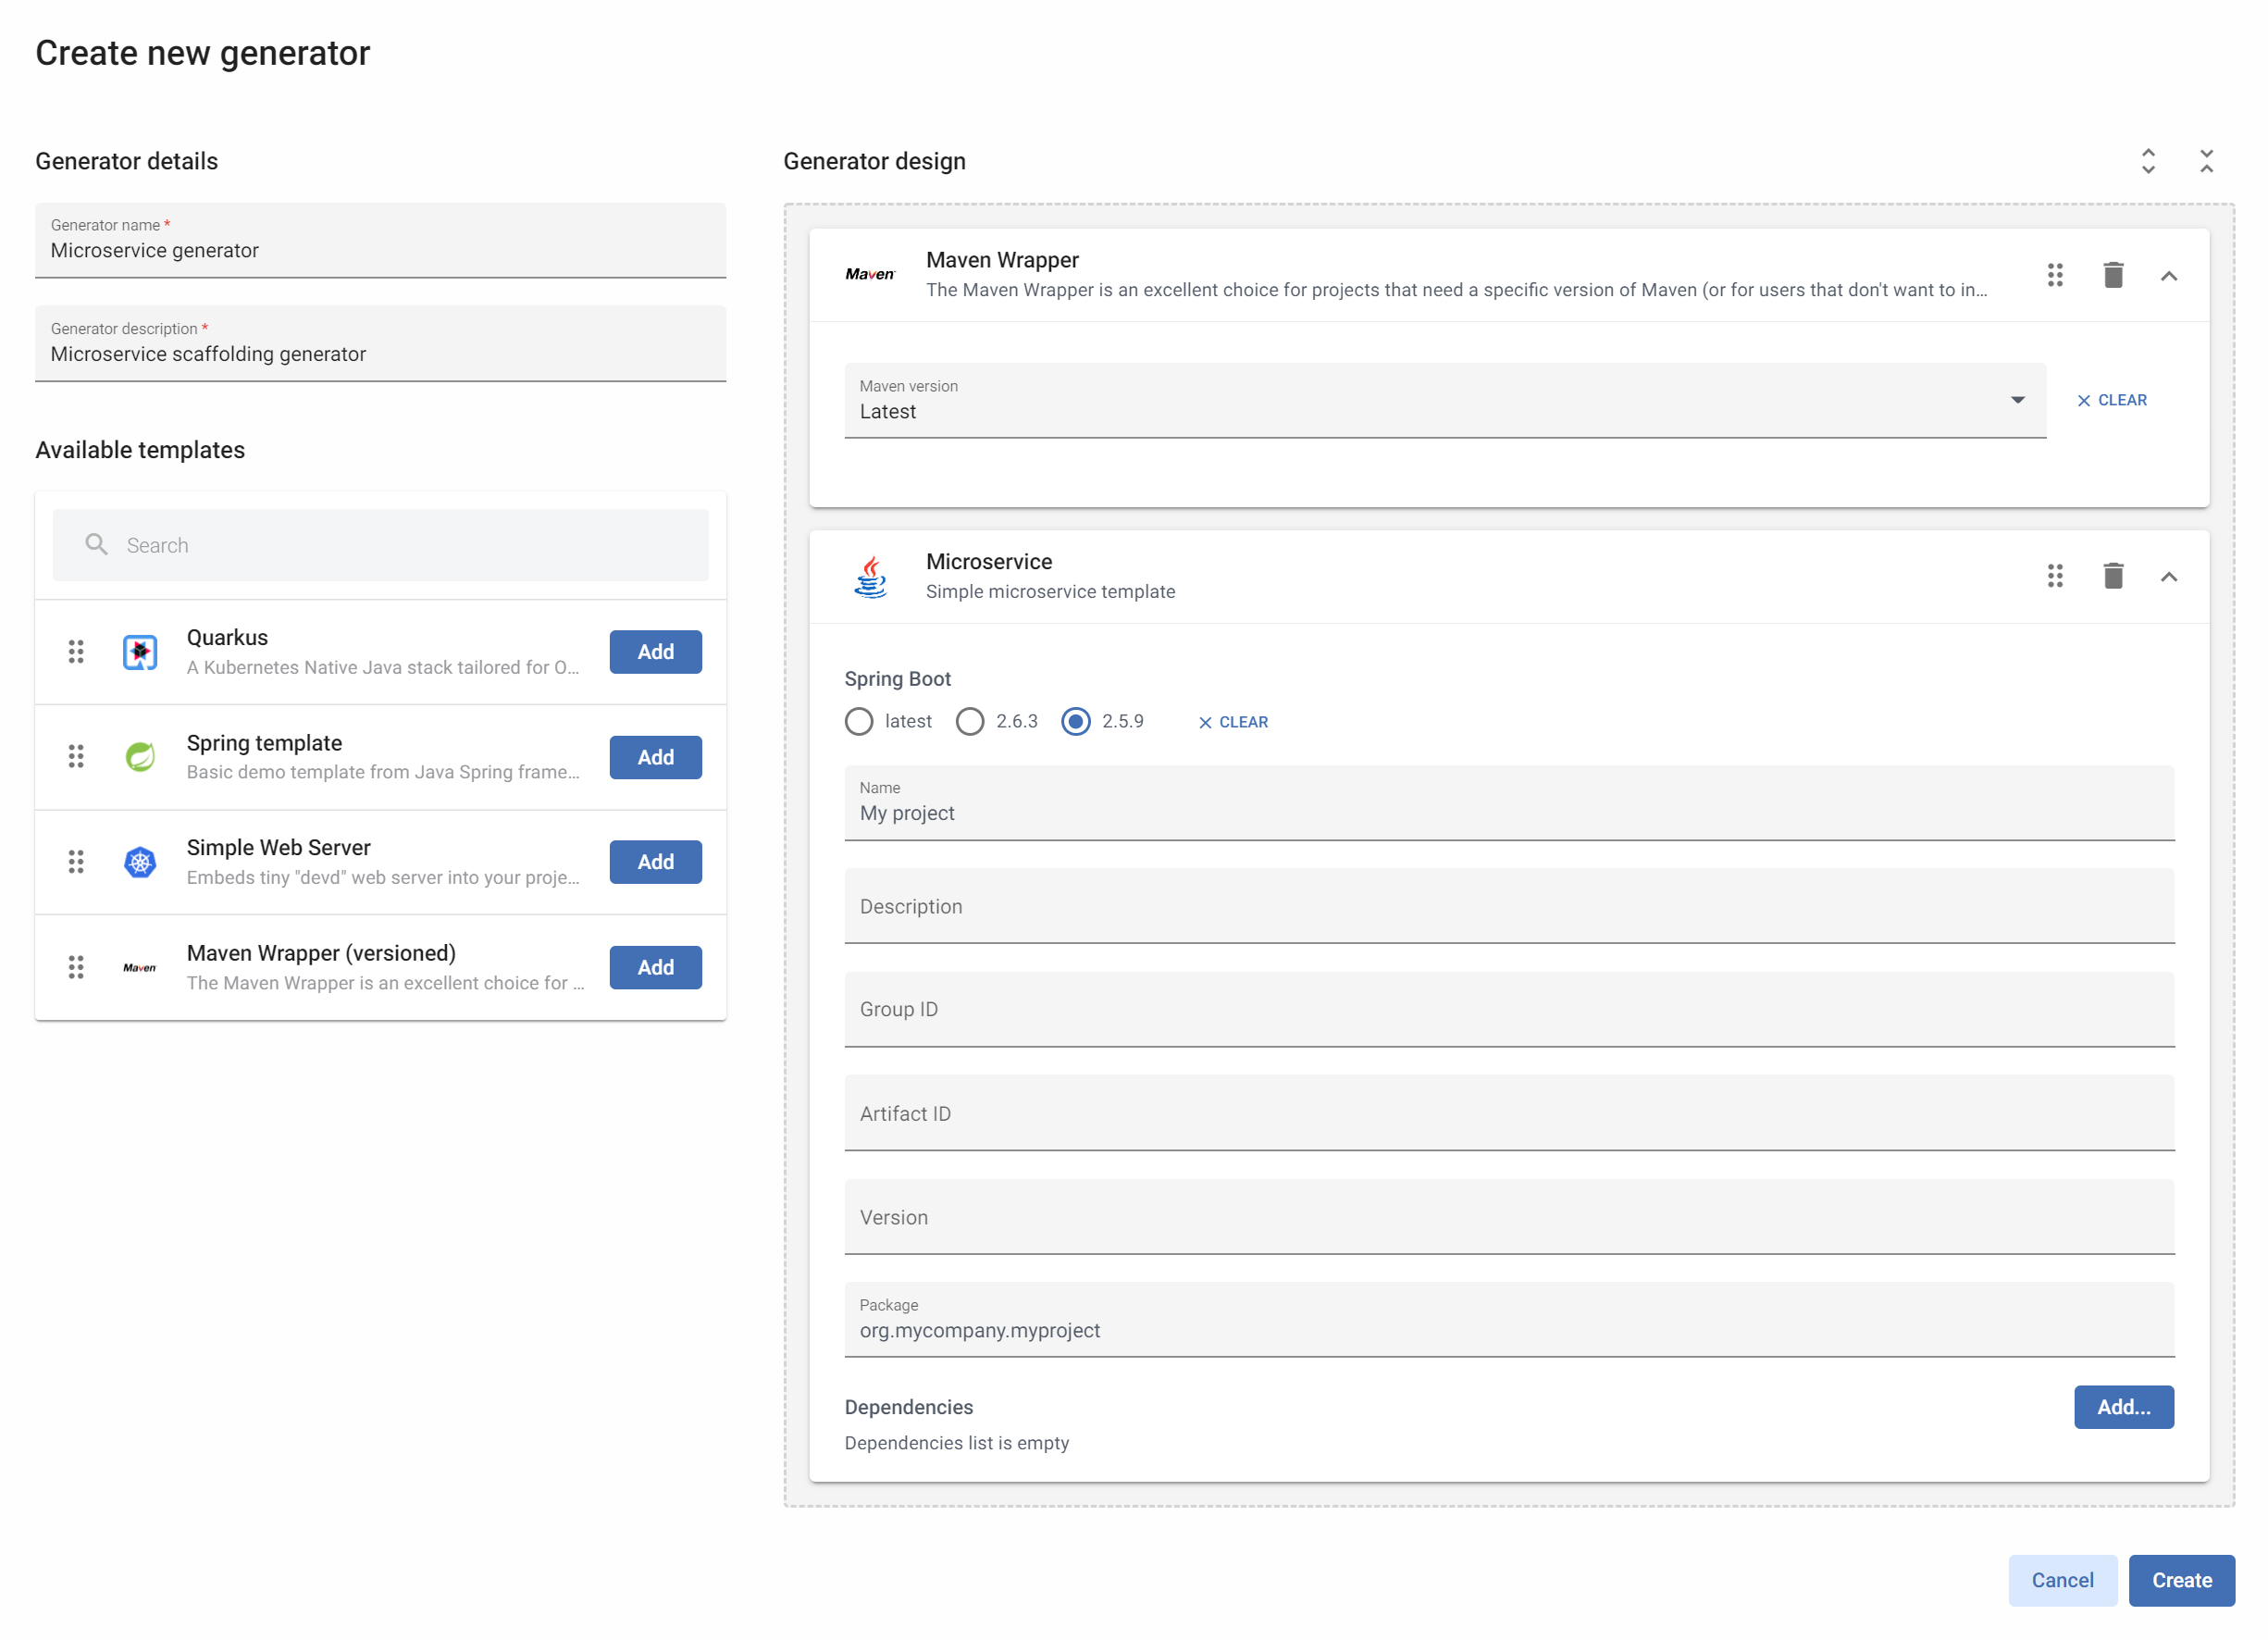
8. Create generator
Now we can finally use our template and combine it with Maven Wrapper template into generator. Open Generators → Create generator. Add your Microservice template and Maven Wrapper template. Yo can prefill template inputs with default values (for example preselect default SpringBoot version or add default package value).
9. Execute generator
Wooohoo, your generator is now prepared. Every time your team needs to start a new microservice project, just open Generators click on execute button (play icon), fill project details and click Execute.

Your project will be generated in a seconds, download the sources or export them directly into new Git repository.
Now you can download the sources and execute the generated project by running ./mvnw spring-boot:run. When you open http://localhost:8080, the microservice landing page should look like this (depends on what values you filled in generator execution form). Check also pom.xml or Java files, all variables will be interpolated here as we defined: